Adding Association Query Shortcuts
In this project, we’re going to practice querying our tables more; in particular, we want to practice leveraging the foreign key columns we added to traverse associations between tables.
And, since we make these particular queries (the ones to find associated rows from other tables) so often, we’re going to add instance methods that wrap up the logic and make it a snap to use.
Setup
- Click “Load assignment in a new window” in Canvas.
- This will automatically fork the project on GitHub for you.
- Create a Gitpod workspace to work on the project.
- It will automatically run the
bin/setupscript for you once the workspace is created. - Once it’s done, and you’re back at a command prompt (
$), you should be able to hop into arails consoleand test it withUser.count(there are0records in that table for now).
The domain model
Here’s the what the domain model looks like in this application, using Entity Relationship Diagram notation:
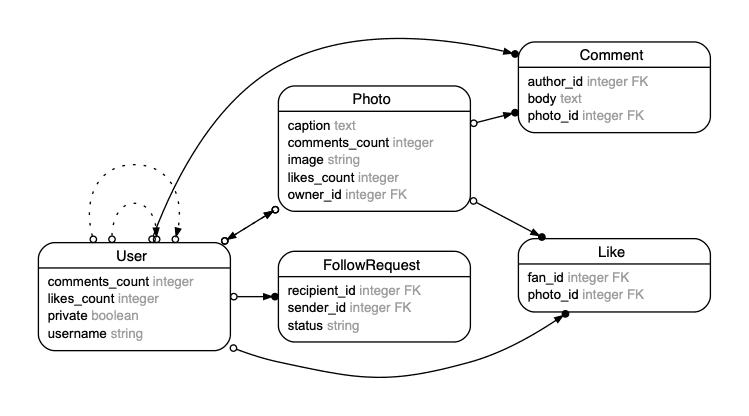
It’s similar to the paper database we printed out on Day 1; if you have it, pull it out, because it will be very helpful to look at it while you are planning out how to write your queries.
I’ve already created these tables by running the following commands:
rails generate draft:model user username:string private:boolean likes_count:integer comments_count:integer
rails generate draft:model photo caption:text image:string owner_id:integer likes_count:integer comments_count:integer
rails generate draft:model follow_request sender_id:integer recipient_id:integer status:string
rails generate draft:model like fan_id:integer photo_id:integer
rails generate draft:model comment photo_id:integer body:text author_id:integer
I’ve already run rails db:migrate to execute these instructions.
Play around in rails console
Pop open a rails console and verify that the models got set up correctly:
User.count
Photo.count
FollowRequest.count
Like.count
Comment.count
It would be a huge pain to have to create records in each table before we can practice writing queries, so let’s run the usual program that I include to fill the tables with dummy data. Open a new Terminal to get to a regular command prompt ($) and run:
rails dev:prime
Then, back in rails console, try counting each table again. You should now have a bunch of records.
A quick-and-dirty visual interface for the database
So far, we’ve focused on learning how to interact with our database tables using Ruby, and we’ve been testing that Ruby quickly via the rails console. Ultimately, we’ll write Ruby programs that do some useful recordkeeping for our users; and we’ll build our users a nice graphical interface to use our programs.
For now, let’s give ourselves a graphical interface to see our database tables; seeing Array containing 323 Photo records when we do Photo.all is just not very helpful. Fortunately, there’s a very nice open-source gem called ActiveAdmin1 that we can include in our project that will automatically give us a quick-and-dirty overview of our database tables.
After including it, there’s not much else to do in order to get ActiveAdmin’s basic functionality; we can just start using it. First, we need to start our web server so that we can begin visiting pages in our application. To do so, at a command prompt, run the command rails server -b 0.0.0.0; or we’ve included a slight shortcut:
bin/server
Once the server starts (this may take a few seconds), Gitpod should open a pane with our live application running inside it2. Since our IDE (Integrated Development Environment) is already so crowded (with our file explorer, text editor, and terminal), I like to click on the little icon on the right side of the address bar to pop the application open in its own tab.
We should now see the “Yay! You’re on Rails!” default homepage that Rails displays to let us know that everything is working and ready to go. Once we add our own homepage, this will go away. However, since we’ve added the ActiveAdmin gem, there’s another page that already works — /admin. Add that on to the end of your URL and press return — it should look something like:
https://very-long-random-string.ws-us1.gitpod.io/admin
You should see a page asking for an email and password. The default credentials are
- Email:
admin@example.com - Password:
password
Finally, you’re in. In the navbar along the top, you’ll see links that map to each table. Explore the interface and play around. Phew! This is a much easier way to explore our data than rails console! We can even export CSVs from here, if we want to.
Okay, now that we know we have ActiveAdmin as a resource to look at, it’s time to get back to practicing querying with Ruby.
Aside: Resetting the database
If for some reason later you want to reset the database to square one, you need to first destroy it:
rails db:drop
and then re-create all of the tables:
rails db:migrate
and then re-populate them:
rails dev:prime
However, that last step might take a while.
reloading the console
Your goal, ultimately, will be to define instance methods that perform frequently-used queries. While you’re trying to figure out how to do so, it will probably be helpful to bounce between the rails console (to experiment) and your model files (to define instance methods, which could potentially require many lines to ultimately return the correct thing).
Remember that if you make any changes to a model file, you must exit from the rails console and then launch it again. Or, if you use the reload! technique, then don’t forget to also recreate any variables you were using before the new logic will be available.
Queries to write
Appetizers
Here are some rails console appetizer queries to try. For the user "Trina",
- How many photos has the user posted?
- How many photos has the user liked?
- How many comments has the user made?
- How many photos has the user commented on? Is this the same as the number of comments the user has made? Hint: there’s a method called
.distinctthat you can call on a collection to remove duplicates.
- How many photos has the user commented on? Is this the same as the number of comments the user has made? Hint: there’s a method called
- How many follow requests has the user sent?
- How many of those were accepted? (I.e. how many people is the user following?)
- How many follow requests has the user received?
- How many of those were accepted? (I.e. how many followers does the user have?)
- What are the usernames of all of the people the user is following?
- How many photos are in the user’s feed (photos posted by the people the user is following)?
- How many photos have the people the user is following liked?
Your tasks
Ultimately, define the following instance methods to encapsulate the logic you discovered in the appetizer queries:
Note: In the Ruby community, a shorthand for saying “an instance method3 called zebra on Photo” is “Photo#zebra”. (Unfortunately this is yet another thing that the octothorpe symbol is (over)used for.)
Photo#postershould return the record for the user who posted the photo.Photo#commentsshould return an array containing the records of the comments made on the photo.Comment#commentershould return the record for the user who authored the comment.Photo#likesshould return an array containing the records of the likes made on the photo.Photo#fansshould return an array containing the records of the users that have liked the photo.-
Photo#fan_listshould return the usernames of the users that have liked the photo as a sentence — the return value should be a singleString, such as"alice, bob, and carol".Hint: Rails adds a handy method to
Arrays of strings called.to_sentence:https://api.rubyonrails.org/classes/Array.html#method-i-to_sentence
User#commentsshould return an array containing the records of the comments the user has made.User#own_photosshould return an array containing the records of the photos posted by the user.User#likesshould return an array containing the records of the likes created by the user.User#liked_photosshould return an array containing the records of the photos the user has liked.User#commented_photosshould return an array containing the records of the photos the user has commented on.User#sent_follow_requestsshould return an array containing the records of all of the follow requests that were sent by the user.User#received_follow_requestsshould return an array containing the records of all of the follow requests that were received by the user.User#accepted_sent_follow_requestsshould return an array containing the records of the follow requests that were sent by the user and accepted.User#accepted_received_follow_requestsshould return an array containing the records of the follow requests that were received by the user and accepted.User#followersshould return an array containing the records of the people whose follow requests the user has accepted.User#followingshould return an array containing the records of the people that have accepted the user’s follow requests.User#feedshould return an array containing the records of the photos posted by the people the user is following.User#discovershould return an array containing the records of the photos that are liked by the people the user is following.
Run rails grade when you’re ready to see how you’re doing.
-
I’ve already included ActiveAdmin in this Rails application, and will add it to all of the projects that we work on. In general, to add a gem to a project, you add a line to the file called
Gemfilewhich is located in the top-level folder (or “root” folder) of the project. If you’re curious, you can take a peek at that file and see that I included the gem on Line 8; then I ran the commandbundle installat a command prompt in order to install the gem. Each gem will have its own setup steps after that; you have to read its README to find out how to use it. ↩ -
If Gitpod didn’t automatically open the app for you, then press Cmd+Shift+P (Mac) or Ctrl+Shift+P (Windows) to bring up your Command Palette and search for “Toggle Open Ports View”. You should then see a pane that shows port
3000open (if your server started successfully) and buttons next to it to “Open Preview” and “Open Browser”. ↩ -
The analogous shorthand for class methods uses a
.instead of the#: “a class method onPhotocalledzebra” is abbreviated “Photo.zebra”. ↩